Tuesday, June 29, 2021

Photos of Spring 2021 Projects

Photos of projects from Handwork Teacher Training - Spring 2021!

Ancient India

Ancient Persia

I really struggled with this painting so I did it multiple times

Ancient Egypt

Ancient Greece

this painting is incomplete, as my computer kept booting me out of Zoom  

Industrial Revolution

crockpot dyeing wool felt & silk embroidery floss with turmeric root

from top to bottom:
red onion skin
yellow onion skin
turmeric root
avocado skins & pits (with iron)

it is amazing the difference betwen red and yellow onion skins!

my golden circle mat, ready for embroidery
turmeric - gold
acovado + iron - silver
onion skin - copper

my mat actually turned out extremely well and it was lovely, but...

we used it all during our Outdoor Classroom to hold the silver bell
and since turmeric root is not lightfast, it faded in the sunshine

beautiful mahogany thread palette

Mario says that when placed on a table, it should be irresistible
mission accomplished!

thank you, Nicole, for dyeing us such lovely colors!


painted linen square

finished seed stitched mat

needle case in progress (and learning the buttonhole stitch)

again, you see the turmeric dye is not keeping its color


kumihimo disk

knitted & crocheted owl

doing the bundle dye workshop at the end with Zac was a lovely bonus

and it was only fair that we do something special together, since he had to be so quiet all week while I was on Zoom all day long in my training!


Anne-Marie Kavulla is extraordinary and if you get a chance to take a workshop with her, I highly recommend it!

this is yellow cosmos, weld, madder root, and woad seeds


~ ~ ~ ~ ~


In all honesty, lots of bonus projects were also shared with us. It is so so temptingly easy to post a video to Google Classroom! But since I went right from this training week into opening up our school in-person on March 1st, had to focus on adapting to an Outdoor Classroom, and taught up until the week before my new training session began, I didn't do any of the extras.

extra project ideas & videos included:

collaborative knitted & crocheted farmyard (each student does a square)

knitted & crocheted garden with bunnny & carrot

mini knitted farmyard with sheep finger puppet

sheep shearing shadow puppet show with marionettes

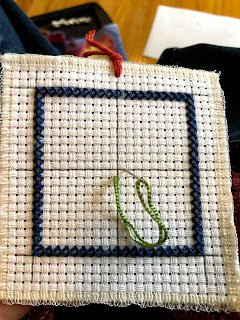
how to tie a heart-shaped Celtic knot

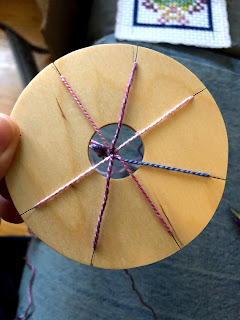
self-striping rainbow ball

instructions for mordanting cellulose fiber

beeswax wood finish recipe

watercolor painting tutorials

eco-dyed yarn experiments for families to do at home during COVID (mordanted yarn, dyestuff, water, glass pie dish, bake in oven at 400 degrees for 30 minutes)

more ideas for fun & fine motor things to do at-home during COVID

  • block beeswax crayon "weaving" plaid with warp & weft
  • assembling paper quilts with pieces of various patterns
  • trick apple slicing
  • peeling an orange peel to match the f-hole on a violin
  • making a tiny goblet out of a metallic chocolate wrapper
    "the flagon with the dragon holds the brew that is true!
    or was it the chalice from the palace?"
  • folding an 8 page mini book from a single sheet of paper
  • ladle levitation


Handwork Teacher Training - Spring 2021

Applied Arts Program Cycle 11 at the Fiber Craft Studio, located on the Sunbridge campus (Orchard House), next to Green Meadow Waldorf School

we met virtually on Zoom for this session due to the COVID-19 pandemic


Week One included

    eurythmy with Anna Ziegner
    curative education lecture series with Sarah Deichmann
    anthroposophy & watercolor painting with Kelly Beekman
    woodworking with Mario Rodriguez
    handwork with Nicole Rodriguez and Miho Suzuki


readings (we had more readings than usual because we were remote)

curative education


anthroposophy & watercolor painting


handwork

    "Rudolf Steiner in Action: Indications for Design in Handwork - Part 1" by Louise Van Blommestein (PDF)


notes from painting

    Monday - Ancient India
    lemon yellow, ultramarine, permanent rose

    1st - color experience
    2nd - formed painting of Shiva (we did not do this)


    Tuesday - Ancient Persia
    lemon yellow, ultramarine, carmine

    1st - color experience
    2nd - formed painting of Ahura Mazda and Ahrimen


    Wednesday - Ancient Egpyt
    lemon yellow, golden yellow, ultramarine, vermilion

    1st - color experience
    2nd - formed painting of the Sphinx


    Thursday - Ancient Greece
    lemon yellow, Prussian blue for color experience

    lemon yellow, Prussian blue, permanent rose, carmine, vermilion for formed painting

    1st - color experience & simple Greek temple using the "paint eraser"
    2nd - formed painting of village, path, sea, Greek temple, mountains, Mount Olympus, the temple home of the gods, clouds, and a rainbow


    Friday - Industrial Revolution
    Prussian blue, ultramarine, indigo, permanent rose, vermilion

    1st - color experience of a sunset (we did not do this)
    2nd - formed painting of heavily industrial scene & sunset background


notes from handwork projects

    Monday - begin 3rd grade embroidered circle mat, sanding and beeswax polishing lesson for wooden thread palette (wow! 75 year old mahogany! thank you, Mario), begin 3rd grade knit & crochet owl

    embroidered circle mat

      choose three colors of embroidery floss, sew 2 rows of each color with running stitch the size of sushi rice (I dyed my circle of felt with turmeric and did copper, silver, and gold thread)

    Tuesday - begin 4th grade painted & embroidered linen mat, shellac lesson for wooden thread palette, discuss and share HW assignments from Spring 2020 session, begin 3rd or early 4th grade needle case

    painted & embroidered linen mat

      paint with yellow, red, blue on wet linen square (as wet as painting paper, start with yellow on the inside) and let air dry

      we used a heavy weight linen, product number 4C22

      note: watercolor paint flows a lot on the wet linen, so learning how to paint this in a controlled way is a little bit tricky
      (you can also dry it a bit with an extra sponge or paper towel)

      tomorrow we will embroider, so choose three colors of embroidery floss that closely match your three paint colors

    Wednesday - continue embroidered felt needle case (learn buttonhole stitch), special guest Patty Urda (3rd grade knit & crochet farm)

    Thursday - finish needle case (add a design in chain stitch or seed stitch), begin 4th grade cross-stitch pincushion / paperweight, continue painted & embroidered linen mat, special guest Patty Urda

    painted & embroidered linen mat

      iron painted linen square, take out threads and create a 1/4 inch fringe so the embroidery doesn't come near the edge, seed stitch with matching thread colors, dense on outer blue and spreading out more as you get closer to the center, be sure to leave empty space in the middle for the thing that the mat will be holding (since this is an item which has a purpose)

    cross-stitch

      6 count Aida cloth from Paper Scissors Stone
      size 3 DMC pearl cotton
      size 20 tapestry needle

      this is not a counted cross-stitch kit with pre-made design
      they create their own designs (4-way or 8-way symmetry)

      designing a pattern on paper and then stitching it is a different skill! we want to focus on one skill at a time

      top & bottom make a difference! mark the top of your cloth with ribbon (the "red bird" can't be on the side)

      have the students walk the cross-stitch pattern using large dots on the floor before they ever begin to stitch it

      start in the lower lefthand corner of the square you want to do!

      "up to the right and over 1
      down to the right and you are done"

      enjoy that feeling! there stands the X

      then think, what is the next square I'm intending to do?

      (after a while, they begin to be able to look forward to the next thing and anticipate where the needle should be, so you say "up the right and over 1, down to the right and over 2")

      it is actually "over" when you are walking the dots on the floor but when you are sewing it you are really going under the fabric at that point! you begin on the far right-hand side of the fabric and work left if you are a right-handed person

      Nicole has a cross-stitch square up in her classroom with 3 mistakes... can they find them?

      we began with a 20 square piece of fabric, do the border (across top and bottom edges) as a chance to practice the stitch (if you do this correctly, on the back you will have only straight bars and no X's) and then do the border on the sides

      do the outside edge in a strong color!

      for the symmetrical design, divide your cloth into four quadrants ("backyards") and start in the square closest to center of the cloth, staying in whatever "backyard" you're in (remember, the needle goes in the lower L hand corner for R hand children and the lower R hand corner for L hand children

      we want the design to unfold for them... do 7 squares in that floss color (they must be touching in some way) and then match it in all four backyards

      switch to a new color... do 7, 8, or 9 squares (remember to start in the center again)

      don't plan it! just let it happen

      every crossing is their call to awakening -- very important in 4th grade -- here I am

    Friday - special guests Elizabeth Seward & Shellie Smith, cross-stitch designs with 8 way diagonal symmetry, 4th grade kumihimo braiding


    we prepared some of our materials in advance at home: dyeing 3-4 colors of the silk embroidery floss, dyeing the wool felt for our embroidered circle mat and the backing to our cross-stitch projects


    and the day after my teacher training ended, I did another workshop on Zoom from the Fiber Craft Studio, which was Bundle Dyeing with Anne-Marie Kavulla! that was fabulous and we used a lighter weight of linen fabric from the same supplier (medium weight, # IL019)


Reading my quick notes here is in no way a substitute for being in the Applied Arts Program, which is incredibly rich and deep, so please do not think that I am sharing them with that intent. I hope to encourage others to take this valuable training with this glimpse into our amazing work. I also find that having the patterns as a quick resource helps me when I have to remake them for my homework. I hope this is helpful to others as well. If you are finding yourself drawn to taking this training, please do consider it!


This post contains affiliate links to materials I truly use for homeschooling. Qualifying purchases provide me with revenue. Thank you for your support!