I'm happy to share my thoughts! Here are the three projects we like to do.

First Grade Immersive Experience
$375.00
lifetime access
limited to 15 people!
Introduction
To introduce finger knitting, I love to read the story Red Berry Wool by Robyn Eversole.

I then teach children to make a slipknot (on the pointer finger of their non-dominant hand) using the method Sarah Baldwin shows here (0:55 - 1:35).
You wrap the yarn around your finger twice. Jump the loop in back over the one in front but DON'T go off the end of your finger. Now jump the new one in back over the one in front and you DO go off the end of your finger.
(Note: The entire rest of the time you are finger knitting you will go off the end of your finger. It is just on that very first jump that you don't.)
Now pull on each tail to see which one tightens the knot. You can also show the children that a slipknot is a Magic Knot because if you take your finger out of the loop and pull on both ends of the yarn, the knot will disappear! Wonderfully, this gives them an excuse to practice making it over and over.
Then we pretend our newly-made slipknot is a sheep and the end of our finger is the edge of a cliff (like in the story). The shepherd lays a loop of yarn down between the sheep and the cliff to try to keep it safe; this is the fence. The naughty little sheep jumps over the fence. So the shepherd has to build another fence. And the naughty little sheep jumps over that fence.
And this just keeps going forever...
I like to say the phrase "tug it to snug it" to remind the children to tighten their stitch after each jump. It's pretty fun to experiment with this. The short tail tightens the knot and the long tail moves the knot up to your finger.
To pause your work?
Take your finger out of the loop and put a pencil in it, then tug it to snug it.
To end your work?
Cut your yarn, leaving a long tail. Take your finger out of the loop, put the tail through the loop, and pull it tight. It will make itself into a knot.
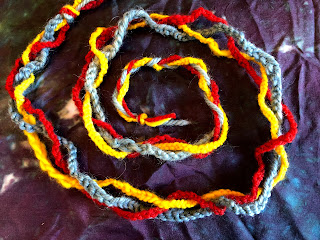
Rainbow Belt
Have the children finger knit a length of blue cotton yarn on the first day, yellow cotton yarn on the second day, and red cotton yarn on the third day. This way they get to experience each of the primary colors on their own. The colors each have their own unique feeling (and you will find that the children finger knit with red very quickly because that is the mood of that color).
Our blue story was Grandfather Twilight by Barbara Helen Berger (the moon). Our yellow story was Earth Mother by Ellen Jackson (the sun). Our red story was Thumbelina by Hans Christian Anderson, illustrated by Bernadette Watts (the flower). We also painted with each color on its day.


Then simply have the children braid the three lengths of finger knitting together to make a Rainbow Belt.
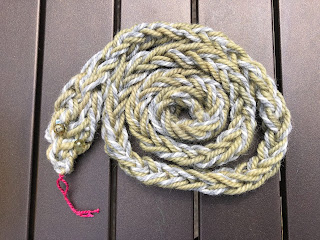
Snake
This wonderful project introduces both 2-finger and 4-finger knitting and the little snake you make couldn't be cuter! It's also fun because children who get really into it can make a snake that's as long as they wish. (You begin with the snake's tail and make its head whenever you are ready to be done.)
For this project you'll need two colors of worsted weight wool yarn. I used little buttons for my snake's eyes and red pearl cotton for its tongue.
Here's the how-to video:
Pony Reins
This is a project that works best with super bulky weight yarn, and the children love to do both the finger knitting and the hand sewing. We use a piece of pure wool felt so that the edges don't fray. Adding jingle bells to your pony reins increases the fun! This project is a great one to encourage outdoor free play and the children are very proud of what they've made.


Cedarwood Waldorf School has sadly taken the instructions for this project down, but I can share the measurements.
Cut a rectangle of wool felt that is 8 inches x 4 inches. You will also need a length of finger knitting that is approximately 72 inches long (this goes much faster with super bulky weight yarn), needle & thread, and three jingle bells.

Fold the short edges of your wool felt over the finger knitting and stitch them down so that you have a loop (which will go around the neck), the felt (which will be the "breastplate"), and two long ends (which will be the reins).


To play with these, one child (the horse) puts the loop over his/her neck. The felt "breastplate" with the bells on it should rest comfortably on his/her chest and the part around the neck should not be too tight. The rest of the finger knitting -- the long reins -- will simply be hanging down at the sides. The other child (the rider) grabs the the reins and stands behind the horse child. The horse gallops and stops at the direction of the rider. Have fun!
This post contains affiliate links to materials I truly use for homeschooling. Qualifying purchases provide me with revenue. Thank you for your support!


 Immersive Experience
 Immersive Experience


No comments:
Post a Comment