We did the Shaving Cream Easter Eggs, Galaxy Easter Eggs, Water Marble Easter Eggs, and the handmade paper in the shape of eggs, chicks, rabbits, and other Easter cookie cutter designs.
The girls also went to church and to their Social Justice Book Club meeting, which was held at the public library since there was an Indie Film Pop-Up screening of a documentary on Dolores Huerta. And Becca had her weekly Spanish lesson with her Spanish teacher.
Here are the notes on the Easter projects:
Shaving Cream Easter Eggs
are easy to do with young children and fun. FYI, these require only a little shaving cream but a LOT of paper towels.
Galaxy Easter Eggs
are simply gorgeous. They're not hard at all to make and they turn out great. You do have to be willing to get a lot of paint on your hands. I started with brown paper mache eggs in two different sizes (these were at both Hobby Lobby and Jo-Ann Fabrics) and they only needed one coat of the black. From there, we didn't bother to let things dry between layers. Foam brushes. No rinse water. We had an old ice cube tray as a palette with some purples, blues, and metallics (copper and gold) plus black and white. And an old toothbrush for the spattering. This is a nice project for a variety of ages because they can be as simple or as complicated as you want them to be.
Water Marble Easter Eggs
are ONLY for teens. So so so pretty but very toxic. There are a LOT of fumes. Do this in a well-ventilated area or outside. The nail polish will eat a hole in a Styrofoam cup, so don't use that to hold your water and nail polish swirl. We used a Talenti container and then recycled it. The water must be room temperature. We also used nitrile gloves to protect our hands in the dipping. These give amazing marbelized results and they take only seconds to make.
Easter Paper Ornaments
are another easy one for young children. I got a wide variety of Easter cookie cutters in different shapes. For the pastel pulp, Becca made five mixing bowls full of little paper scraps and water and let them stand overnight. Each bowl had two sheets of used printer paper and two sheets of construction paper. This makes a very soft pulp. The next day, set up a large stack of old bath towels which can get stained. Make the top of the pile of folded towels equal to the length and width of a dish towel. Make the pile four folded bath towels deep. Place a smooth cotton or linen dish towel on top of the folded towel stack. We blended each pulp color separately in the blender (plenty of water or you'll burn up your motor) and poured it into a few little bowls. Set a variety of colors by each child, with a spoon in each. Set the cookie cutter you want directly onto the dish towel. Spoon the pulp color you want into the cookie cutter. Press the extra liquid out with your fingers and spread it around if needed. You should make sure the pulp fully covers all of the dish towel which you can see inside the shape, but don't let it get too thick. Then lift off the cookie cutter and make the next one. Move the dish towel to a cookie drying rack to air dry the shapes overnight.
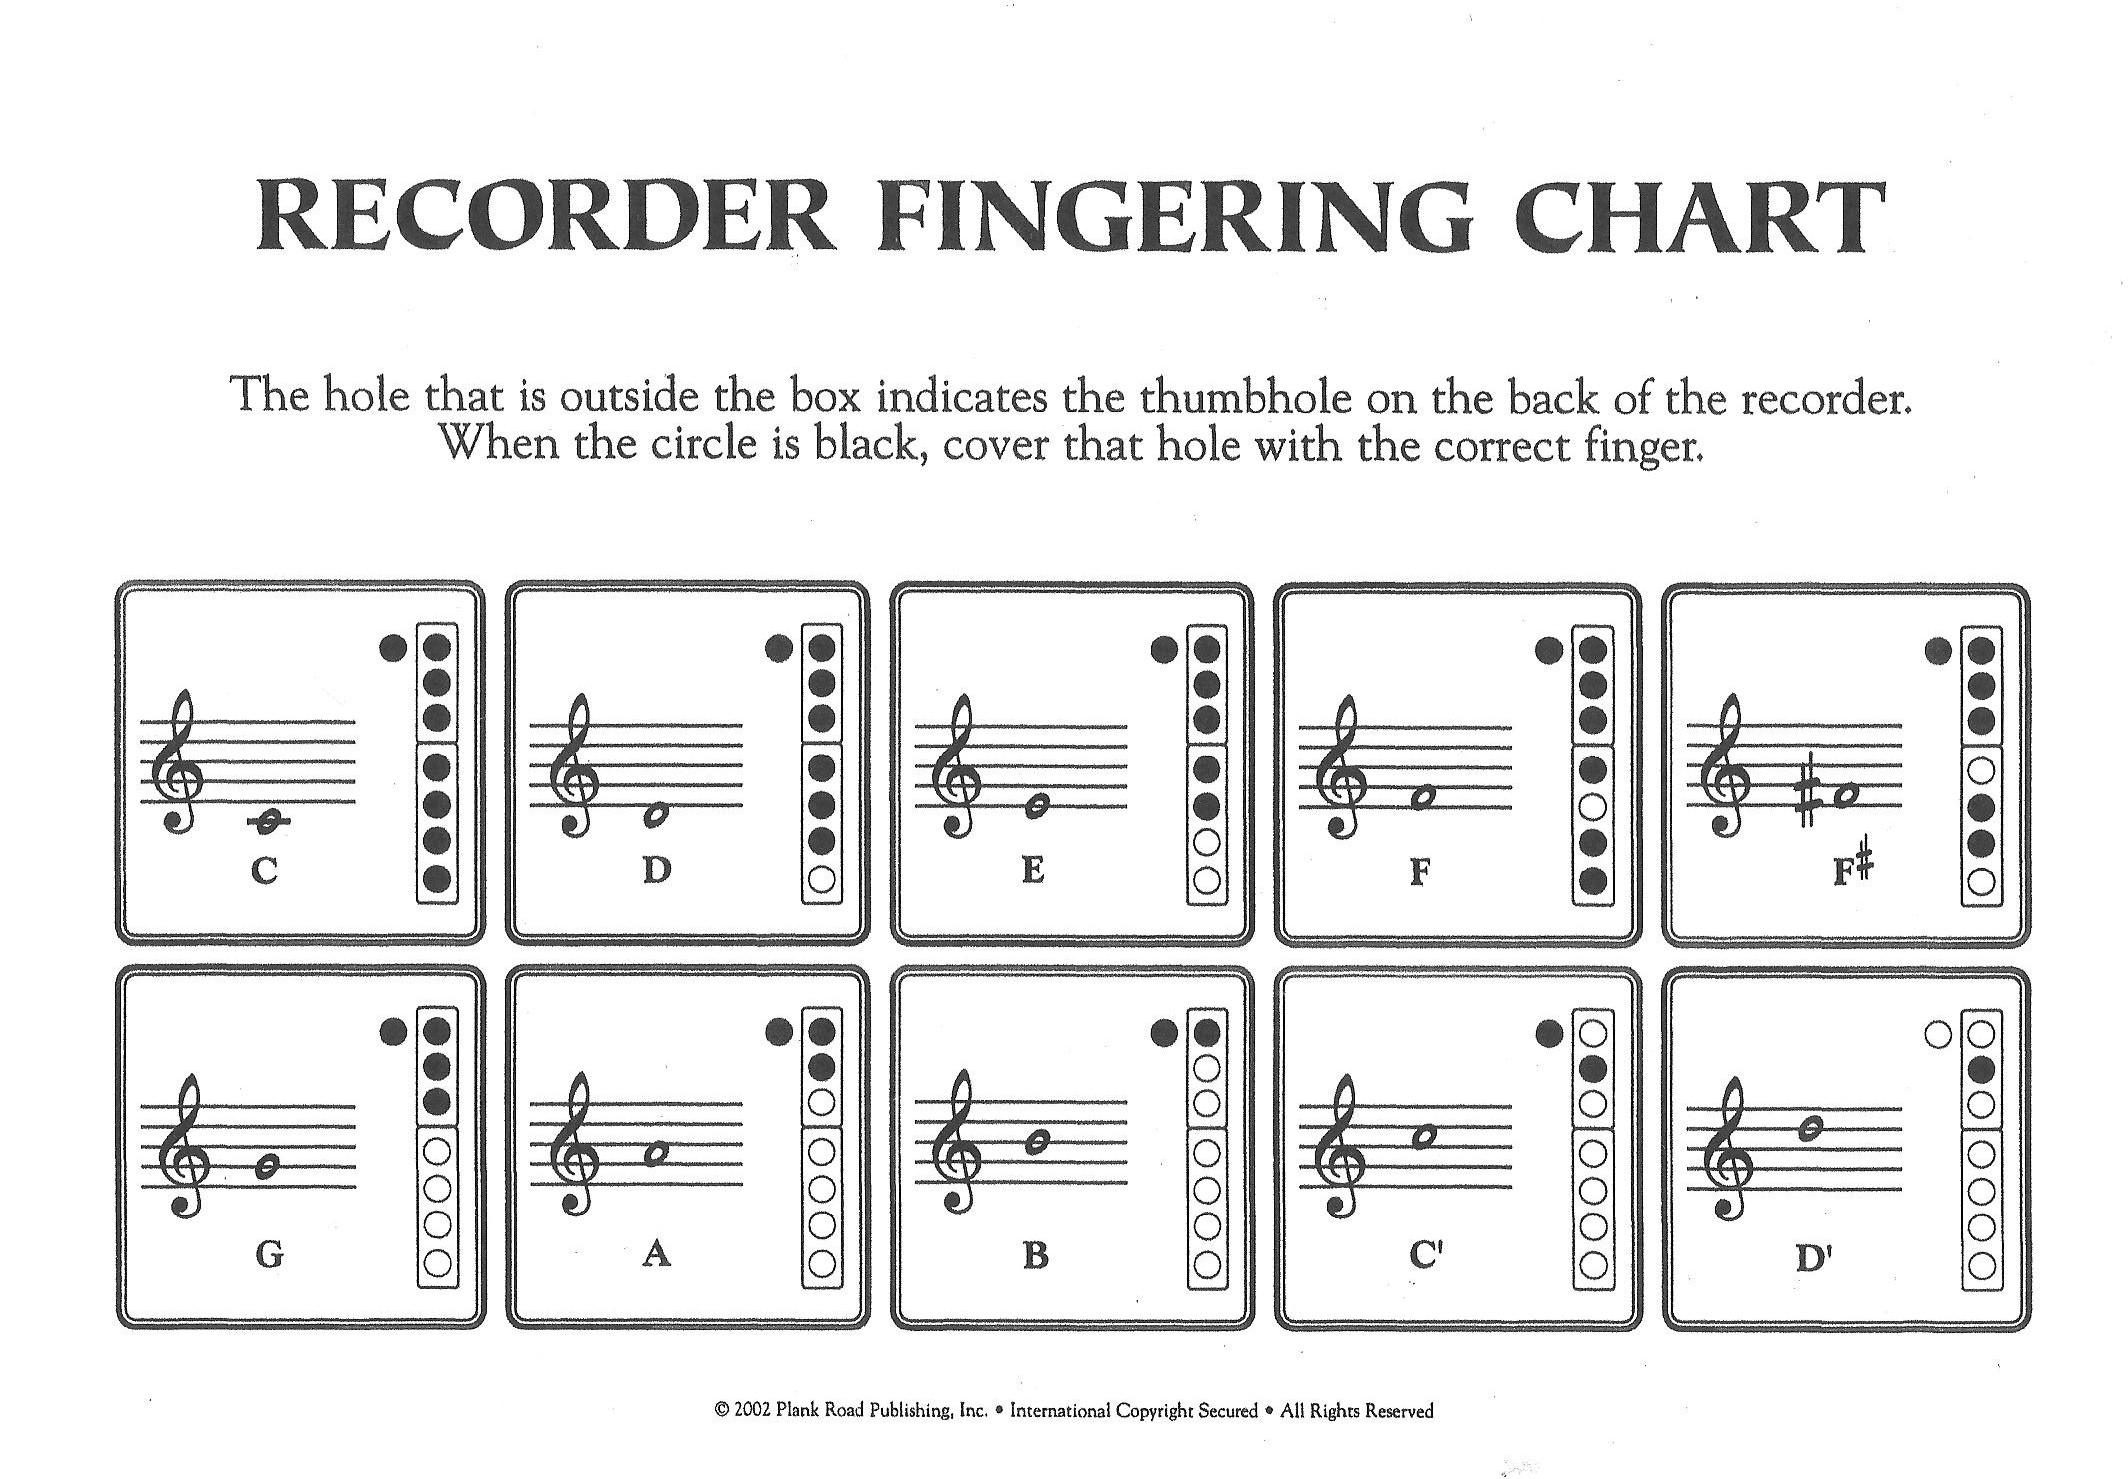
Besides Sunday's weekly handwork time I have many other clubs! Here is a brief update. (And I don't want to forget to mention, for the parents in my class looking for Recorder Karate links to go with the recorders sent home on Monday, here is the sheet music for each level and the recorder fingering chart. You can braid simple "belts" for your child's recorder with embroidery floss and Ms. Kelly is happy to have your child come and test with her to get their "belts" as they master each song. I'm also happy to have kids work on this at school, if they wish, during independent work time.)
Philosophy - Time
- continuing to paint background details for the Tree Weavings
- discussing Augustine, our first philosopher for Time

Science Club - Geography
- starting a new topic by student request: the geography and history of Southern Illinois
- beginning with map making by learning about the points on a compass rose (Never Eat Soggy Waffles/Worms/Whatever)
- making a floating compass by magnetizing a felting needle and placing it inside a short segment of a drinking straw and closing up both ends with modeling beeswax and floating it in a large bowl of water (activity from Physics is Fun!)
- setting up an orienteering course in the field and using a compass to solve challenges

Science Club - Chemistry
- reviewing Sugar and Starch, and watching our saliva turn starch into sugar (activity from Blood and Guts)
- reading about Cellulose from page 197 of David Mitchell's book
- learning about how fiber works in your digestive tract and making Metamucil slime
- feeling and smelling poopoo paper made from elephant poop, and looking at the papermaking recipes in The Gourmet Paper Maker
- looking at the poured paper pulp artwork in Denise Fleming's books, and making our own colorful paper
- sewing up finished knitted cellulose chickens (made with cotton yarn)


This post contains affiliate links to the materials I actually use for homeschooling. I hope you find them helpful. Thank you for your support!


 Immersive Experience
 Immersive Experience
 Immersive Experience


No comments:
Post a Comment