

How to Sew Up a Cross-Stitch Pincushion
My notes from my AAP Handwork teacher training for this are buried in my Handwork Teacher Training - Spring 2021 post, so I'm putting them here!
cross-stitch
-
6 count Aida cloth from Paper Scissors Stone
size 3 DMC pearl cotton
size 20 tapestry needle
this is not a counted cross-stitch kit with pre-made design
they create their own designs (4-way or 8-way symmetry)
designing a pattern on paper and then stitching it is a different skill; we want to focus on one skill at a time
top & bottom make a difference! mark the top of your cloth with ribbon (the "red bird" can't be on the side)
have the students walk the cross-stitch pattern using large dots on the floor before they ever begin to stitch it

*** right handed children ***
-
situate yourself on the righthand edge of the cloth
you will be heading LEFT
then place the needle behind the fabric
in the lower lefthand corner of the square you want to do
"up and to the right, over 1
down and to the right, and you are done"
*** left handed children ***
- situate yourself on the lefthand edge of the cloth
you will be heading RIGHT
then place the needle behind the fabric
in the lower righthand corner of the square you want to do
"up and to the left, over 1
down and to the left, and you are done"
enjoy that feeling! there stands the X
then think, what is the next square I'm intending to do?
after a while, they begin to be able to look forward to the next thing and anticipate where the needle should be, so you can then say "down to the right (or left) and over 2"
note: it is actually "over" when you are walking the dots on the floor but when you are sewing it you are really going under the fabric at that point! the "overs" are where you are traveling on the backside of the fabric, and it makes a tidy little row of lines

the "up (or down) and to the right (or left)" is the part of the verse where you are working diagonally on the front of the fabric

we began with a 20 square piece of 6 count Aida cloth
first make the border (across top and bottom edges) as a chance to practice the stitch (if you do this correctly, on the back you will have only straight bars and no X's) and then do the border on the sides
do the outside edge in a strong color!
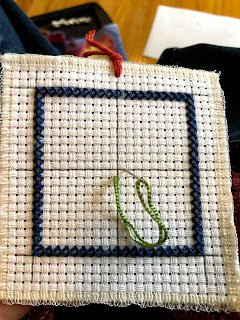
for the symmetrical design, divide your cloth into four quadrants ("backyards") and start in the square closest to center of the cloth, staying in whatever "backyard" you're in (remember, the needle goes in the lower L hand corner for R hand children and the lower R hand corner for L hand children
we want the design to unfold for them... do 7 squares in that floss color (they must be touching in some way) and then match it in all four backyards
switch to a new color... do 7, 8, or 9 squares (remember to start in the center again)
don't plan it! just let it happen
Once you learn how to cross-stitch there are all kinds of wonderful projects you can do!





 Immersive Experience
 Immersive Experience
 Immersive Experience
 Immersive Experience


No comments:
Post a Comment